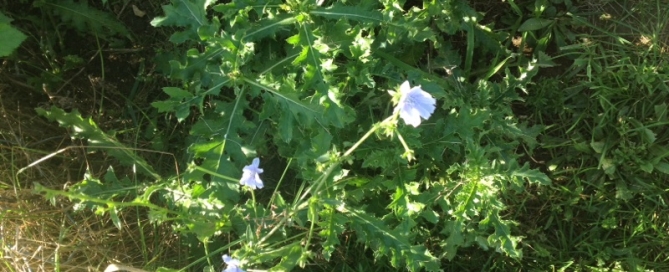
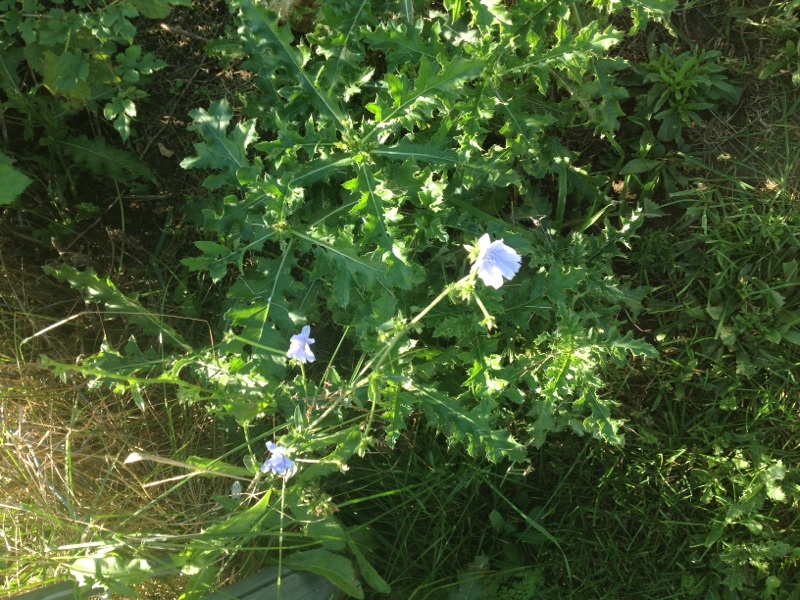
Common Chicory

/Common Chicory/

Common Chicory

Chicory is a wildflower often seen along roadsides. Easy to grow and control in the garden when grown as an annual from seed each spring. A bit weedy at times and is more suited for the prairie. The non-native Common Chicory has been reported in nearly all areas of Illinois, except a few counties in the NW and SE sections of the state. It is quite possible that Common Chicory occurs in those counties as well. This plant originated from Eurasia, and was present in Illinois by the late 19th century. It has been spreading steadily ever since and has become common, particularly in disturbed open areas. Typical habitats include pastures, abandoned fields, areas along roadsides and railroads, grassy areas that are not mowed regularly, undeveloped real estate lots, and other waste areas. Occasionally, Common Chicory colonizes disturbed areas of natural habitats (e.g., early stages of a prairie restoration), but it is not a serious invader of such natural areas in the long run. The flowers attract short-tongued bees and probably other insects. Both nectar and pollen are available as floral rewards. The foliage of Common Chicory is eaten by Melanoplus bivittatus (Two-Striped Grasshopper), Melanoplus femurrubrum (Red-Legged Grasshopper), and probably other grasshoppers. The larvae of a lizard beetle, Acropteroxys gracilis, bore through the stems of this plant, while the caterpillars of the moth, Pyrrhia exprimens (Purple-Lined Sallow), feed on the the flowers, buds, and developing achenes. Because the foliage contains a bitter white latex, it is probably not preferred as a food source by mammalian herbivores, although cattle and sheep reportedly eat the basal leaves.

By | 2015-11-13T20:37:07-08:00 December 13th, 2015|Annuals|0 Comments

Die Back On Cherry Tree

Without seeing your tree in person it's impossible to say what is causing the die back pictured. But listed here are some possible of the causes of such damage. Keep in mind that sometimes what we see on plants isn't caused just by one thing, but a combination of two or more situations, so what you are seeing might be caused by one or more of the following:
1. Physical damage: If a branch is broken, bent, or otherwise damaged it can brown and die.
2. Borers or bark eaters: physical damage can also be caused by insects that bore into a stem, or by critters that eat the bark around a stem.
3. Drought: when a plant is growing in dry soil it may have die back on top since the roots dry up and there aren't enough roots to sustain all the stems and leaves up top.
4. Vascular diseases: there are some diseases that cause the vascular system in a tree to shrink so that the water can't flow from the roots up to the stems and leaves.
5. Bacterial Canker: One of the most destructive diseases in cherry trees - there is no cure.

Without culturing in a lab, and seeing the plant and the soil surrounding etc, it's impossible to know which one or more causes are the problem with your plant. But you, of course, want to know what you can do to help this tree in all ways possible. So here is what you can do:
1. If the stems that have brown leaves are dead, prune them off. If you don't know yet if they are dead, wait until next spring and once the plant starts to break dormancy, prune off any branches that don't have new life on them.
2. Look at the trunk of the tree carefully - if there are sunken areas, especially if there is sap dripping from those sunken areas, it's probably canker and there is nothing to be done.
3. Look at the stems that have wilted carefully: are there any holes or scrapped bark where the die back starts? If so, prune off these branches and throw away.
4. Next year after the plant starts to leaf out, watch for new signs of wilting. At the first sign, take a branch into your local cooperative extension or garden center to see if they can identify the problem. Don't take in branches that are already dead as it's difficult without lab culture to see what the problem is once the area has died. Try to take in samples of the problem just starting.

Cherry trees are prone to numerous problems in this area, both diseases and insects. If your tree dies, pick some other variety of tree to replace it.

By | 2017-09-11T15:49:30-07:00 December 13th, 2015|Trees|0 Comments

Yellow Leaves On Pothos

The yellowing of older leaves is pretty common on most houseplants as they occasionally shed the old while growing new foliage. So if the leaves that are turning yellow are the oldest ones, near the bottom of the stems not the ends, it might just be this natural process. If the yellowing leaves are more numerous and are happening over the entire plant the first thing to consider is the watering. Plants will shed more of the older growth if they are drying up in between soakings. When water isn't abundant the plant sheds some of the leaves in order to preserve the new growth.

Leaves that go yellow are also a sign of over-watering or poor drainage, however. Pothos do best when allowed to go slightly dry (but not wilting) between waterings. If your soil has been kept constantly wet that causes root rot which leads to yellowing leaves.

The other thing that can affect indoor plants at this time of year is cold drafts from being too close to a cold window, and hot drafts from a heating unit too near the plant.

To figure things out the first thing to do is to tip the plant out of the pot. If the plant has white roots that means it probably isn't root rot in that rotting roots are tan and brown. If the plant is very root bound, with congested roots that circle around and around in the pot, it's time to put the plant in a new pot with new soil. (Note: don't put any rocks or shards at the bottom of the pot - it's the holes in a pot that are for drainage and other debris is bad for plants!)

If the roots are healthy and not too crowded, decide if you've been watering well enough - soak the entire root ball well every time you water but don't let the plant sit in a saucer of water after it has gotten well hydrated. Don't bother "misting" the plant - that does little to raise humidity and causes leaf-spot fungi.

Pick off the worst of your yellow leaves so you can monitor if the problem is continuing. You can fertilize the plant sometime in March when the days are getting longer - use fertilizer according to directions.

By | 2015-12-13T06:48:00-08:00 December 13th, 2015|House Plants|5 Comments

Scale Insects

You are correct. We can't see clearly what the species the scale is, but it is some kind of scale insect. These insects don't usually cause major problems to plant health unless their population is very large. However, if you don't control them, and the conditions are right for their reproduction, they can get out of control. Keep your plant healthy and it will be better able to withstand the insect feeding. Control for scales varies by species or type of scale. We've included a link for your reference in controlling them outdoors, but if this is a house-plant and the population is not large right now, we suggest you use a dilute solution of rubbing alcohol and water on a damp cloth and wipe the scales off of the leaf and stems (if they are also feeding there). Don't over-do the alcohol as you can cause damage to the protective leaf cuticle with too high a concentration. You can also give the plant(s) a shower, literally, to clean off the sticky "honeydew" exudate. Keep an eye out and continue to remove developing scales. Otherwise, if the population numbers are high you can use pesticidal products, but they may not be very effective on the adult (covered) stage of the scale (they will work on the younger crawler stage if applied correctly). We recommend you use horticultural oils whenever possible (you'll want to apply outdoors, but keep the plant in a shady location and make sure its watered a few hours before applying the oil to avoid burning the plant tissues)
For outdoor plants: http://www.ipm.ucdavis.edu/QT/scalescard.html

By | 2015-12-12T23:19:09-08:00 December 12th, 2015|Plant Pests|0 Comments

Ailing Lemon Tree

There are several possibilities here and more than one of the following problems might be causing what you are seeing. It could also be a part of the normal process that the plant goes through. If the leaf loss is not affecting the whole tree it is probably normal.
1. How long has this plant been in the pot it's in? One reason plants can go downhill like this is if their roots are so congested in the pot that there isn't enough soil for nutrition and to hold onto water. If your plant has been in the same pot for three or more years, it's time to move it up to a larger pot with fresh soil.
2. Did the plant get fertilized recently with a synthetic fertilizer? If so, and it was either fertilized when the soil was dry or at too high a concentration, it might be fertilizer burn you're seeing. Fertilizer burn turns the tips of plants brown. Be sure to never water a thirsty plant and only use the concentration recommended. Better yet, use one of the organic fertilizers formulated for citrus trees. Citrus should get fertilized regularly year round - apply according to directions on the product you use.
3. Something dumped in pot? Someone slipping the remains of their drinks, or the plant getting hit (on leaves or soil) with household cleaning products, can also cause leaf death such as this.
4. Plant drying between waterings. Although you've had this plant for awhile and have been watering it regularly, sometimes things can change so that your usual routine is no longer enough. Examples of such a change are being root bound (#1) or the plant being moved suddenly into more sun.

By | 2015-11-13T20:55:45-08:00 December 12th, 2015|Fruit Plants & Trees|0 Comments

Gardenia Problem

Did you see any signs of this before the plant was repotted? Blackening of the leaves in this manner wouldn't be caused by insects, so we can put that aside for now. Such symptoms could be caused by fertilizer burn, contact with other products, nutritional issues or fungus. Of all of these, the most likely would be fertilizer burn or contact with other garden or household products. Did you fertilize when you repotted? If so, might you have used fertilizer that was mixed too strong, or applied fertilizer to a thirsty plant? If you think that this is possible, I'd say that this is fertilizer burn. Might there have been window cleaner, or a plant spray that hit the leaves? Could it have gotten drift from another cleaning product or was a pesticide applied?

It's impossible to diagnose a fungal problem or nutritional deficiency from a photo alone - you'd need a lab culture or soil analysis for this.

But the bottom line, that you want to know is, what do you do now? 1. Be sure the plant's new pot has a drainage hole and that there isn't any other stuff (rocks, shards, screening) covering that drainage hole. No matter what our mothers told us, nothing should be in a pot but potting soil and the plant. 2. Keep soil evenly moist - not swampy or sitting in a saucer of water and not drying out between waterings. 3. If you think too much fertilizer or contact with another product is a possibility, flush the soil well with lots of water by placing the plant in a sink or shower and running room-temperature water though the pot for awhile. The plant will shed any such damaged leaves but as long as the stems didn't get burned too much it will recover. 4. Place in a bright location but not right next to a southern window - in an eastern window is fine, or a foot or two out from a western or southern window. 4. In late May you can put this outside in a morning sun afternoon shade location if you have one - water every two or three days depending on the temperature outside.

By | 2015-12-12T18:05:24-08:00 December 12th, 2015|House Plants|0 Comments

Blueberry Problem Solving

This is not typical fungal damage that we frequently see on blueberries, so it might be most helpful to lead you though some problem-solving steps about leaf issues and this plant. You can think about these and decide what might best apply to your bushes and be most helpful.
1. The first thing to do is to look at how many leaves are affected and where they are on the plant. Are they all on the tops of the shrubs, for example? Or are they randomly placed on the tops, middle and bottom of the shrub? This is important in that if they are all on one side of a shrub, or all on the top of the plant, this would argue that something has hit the plants on that side or on the tops and caused the blackening that you see. Some possibilities include hot water (from a sun-heated hose), garden product/spray (fungicide or insecticide), cleaning product/spray, liquid fertilizer, etc.
2. Are the areas where the blackening is showing up more frequently hit with water from irrigation? Repeated splashing of water on foliage is a prescription for every fungal disease in the book.
3. Is the damage still going on? Remove any damaged leaves you see and monitor the shrubs over the next two or three weeks. If the damage has stopped, then no matter what has caused it you can relax and think about how best to protect these plants in the future.

After you think through the possibilities above, the best thing to do will be to
A. Water deeply less often - for blueberries in the Northeast, this is usually a good soaking once a week. Get a rain gauge and water until it shows an inch of water, once a week.
B. If you suspect a fungal problem spray with an organic fungicide such as Actinovate, Seranade, sulfur or copper.
C. Be sure that nothing else is hitting these leaves... no liquid fertilizer, no household cleaners, no insecticides, etc.
D. If you haven't had a soil test done recently this is never a bad idea although damage such as you show in this photo shouldn't be related to the minerals in the soil. Nevertheless, it's good information to have.
E. Don't sprinkle the foliage when you water and try not to have these plants hit with lawn irrigation etc - splashing of water on leaves is a prescription for every leaf spot disease in the book.
F. Fertilize only with an organic fertilizer once a year.

If this problem continues do take samples into your local cooperative extension or knowledgeable fruit-raiser in your area.

By | 2015-12-12T17:12:05-08:00 December 12th, 2015|Shrubs|0 Comments

Tomato Hit With Something

If this damage truly happened overnight in that the day before the plant was fine with no black spots, blackening or yellowing leaves etc, and the next day the plant looked like this then the plant must have gotten hit with something. Diseases move more gradually. Some examples of what might hit a tomato and kill the foliage like this include: Hot water from a sun-heated hose. Fertilizer mixed at too high a level. Drift from herbicide applied elsewhere. Cleaning product being used elsewhere such as a house being power-washed or windows being cleaned. If any of those were the cause you will not see the damage continuing. Mark some of the still good looking foliage and stems with twist-ems or pieces of colored yarn to make it easy to tell if the damage is continuing. If it is, then the problem actually started earlier and has spread to a point where it caught your attention. The most common causes of tomato leaf blackening are early and late blight. Early blight usually starts at the bottom of a plant and moves upwards, causing the foliage to yellow first and then turn black. Late blight shows up randomly on the entire plant including the fruit, starting as darkening and slightly sunken spots that ultimately cause entire leaves, stems and fruit to blacken. In the early stages of early and late blight you can spray with a copper fungicide and still harvest fruit, but once a plant reaches a state where half of it has blackened you just have to pull the plant out of the garden and put it in the garbage or burn it once it's dry.

By | 2015-12-12T07:51:18-08:00 December 12th, 2015|Vegetable Plants|0 Comments

Raspberry

Raspberry plants spread by suckers. This means raspberries like to grow and will spread out far and wide if you let them. But large, unpruned raspberry bushes won't yield more berries and can lead to problems and even early die out of the raspberry bushes. Pruning raspberry plants does more than just keep your plants under control. Raspberries can be prone to disease and pruning inhibits the spread of disease throughout your patch.
To insure that light and air can get inside the plants and to facilitate pruning, keep your raspberry plants controlled in a row. Keep the base of the bushes within a 12 - 18 inch footprint by pruning out any suckers that poke up outside the 12 -18 inch footprint. Don't worry, the bushes will be much larger on top.
There are 2 bearing categories for raspberry plants:
Summer Bearing (floricane) Raspberries will provide 1 large harvest, usually in late summer or early fall. Summer bearing raspberries bear fruit on 2 year old canes, the canes that sprouted last season. Summer bearing raspberries can be further categorized as early season, mid-season and late season. The harvest period lasts about 4 -5 weeks.
Everbearing (primocane) Raspberries aren't really everbearing, but they do generally have 2 harvests per season; one in mid-late summer and one in the fall. They fall crop will probably be a bit lighter and is on 1 year old canes of the current season. Many fall bearing raspberries bear so late in the fall that they are not practical for gardeners in short season climates.

By | 2015-12-12T07:06:17-08:00 December 12th, 2015|Fruit Plants & Trees|0 Comments

Amaryllis Bulb

This is an Amaryllis which is really in the genus Hippeastrum. In northern climates it is a popular bulb that is sold before the holidays and forced into bloom indoors at Christmas and during the winter to early spring months. Keep the plant in a bright to sunny location while it's flowering and be sure that the soil isn't kept too soggy-wet because this can rot the bulb. Water it well when dry but don't let the pot sit in water that collects in gift-wrap foil or a saucer.

If you'd like to keep this bulb alive to bloom again next year, it isn't difficult, but you must do the following:
1. After flowering stops, clip off the spent flower but leave the stem as long as it's green. Cut it down when it turns yellow. Keep the plant in a sunny window, and begin to fertilize using either a time-release product or a liquid feed according to directions. Sometimes these bulbs put up another flower spike, but they usually just produce leaves at this point.
2. Transplant into a slightly larger, clay pot so the plant can be put outside once all danger of frost is past. Use good quality potting soil and don't cover the drainage hole or put anything but soil in the bottom of the pot.
3. Place the plant out in morning sun and afternoon shade for the summer and water when the soil looks dry. Continue to fertilize or apply a time-release fertilizer every two months.
4. In the fall leave the plant outside as it gets cooler but when frost is forecast or seems likely bring the plant into a cool, dark location and stop watering. The combination of the cool temperature and the dark will give the bulb a resting period. Cut off any dried leaves after they wilt.
5. After six or more weeks you can bring the pot into the house and place it in a warm, sunny location again. Start to water and begin the process all over again.
6. Repot every two years or when needed as the bulb begins to make new bulblets to the sides.
Enjoy!

By | 2015-12-12T02:12:57-08:00 December 12th, 2015|Bulb Plants|0 Comments