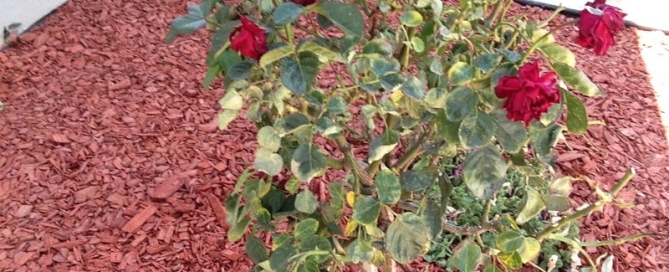
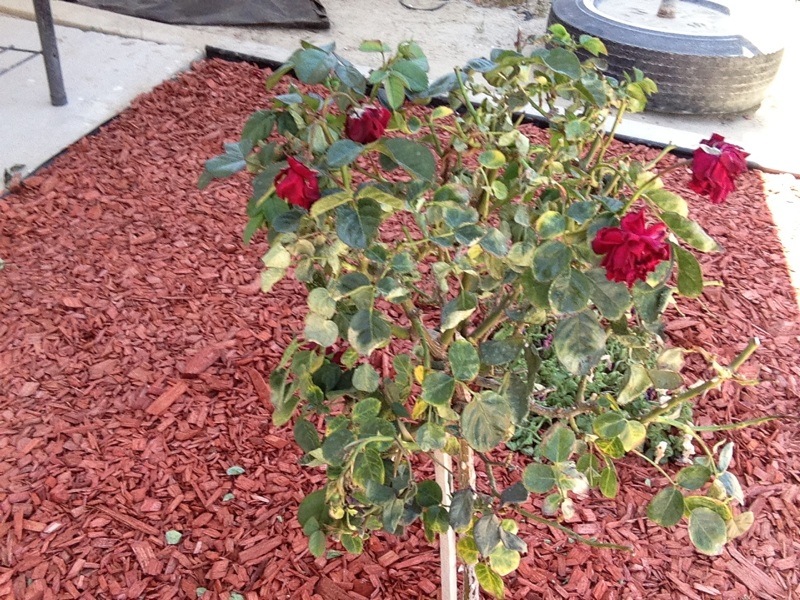
Wilting Rose Bush

/Wilting Rose Bush/

Wilting Rose Bush

Your rose bush could be suffering from both the high temps and dry air, and/or too much water. When a plant is first planted in the ground, it does need to be watered well at the time of planting, but then it should be watered according to its needs after that; always avoid over-watering. Roses, once the root systems are established, only need water once or twice a week in summer, but they like to be watered deeply - so water less frequently but put enough water out to make sure it travels deeply in to the soil and reaches the growing roots when you do water. Unfortunately, the high temps and dry air make it difficult for a newly planted plant to get a good start, and we can understand why you're watering it every day, but that's probably too much water for the not yet established root system. Over-watering can cause plants to wilt as well. If the plant is getting more than 3-4 hours of shade during the day, this can also slow down water uptake. Besides, Roses do best in full sun for 6-8 hours per day. If the soil is moist (or wet) now, don't water again until it has evaporated and begins to dry out in the upper few inches of top-soil. When the temps cool down, you definately should not water the rose every day. Hopefully it will recover from the extremes and the leaves will stop drying out, and the flowers will stop wilting. Here's a link to everything you need to know about Roses from the University of CA. http://www.ipm.ucdavis.edu/PMG/PESTNOTES/pn7465.html

By | 2017-09-11T15:49:33-07:00 November 23rd, 2015|Plant Diseases|0 Comments

Bleeding Heart Problems

It's normal for bleeding hearts to produce spring growth, bloom, and then go dormant later in the summer. There are a number of reasons for leaves turning yellow:

Bleeding heart vines enter a state of dormancy during the summer in which they shrivel up and appear to die. But if you live where summers are hot and dry, the leaves of your bleeding heart can turn yellow sooner than usual.

Bleeding hearts are sensitive to overwatering, which oftentimes causes the leaves to turn yellow. Water only twice a week during the summer, and then gradually reduce water toward the end of summer. Throughout winter, water your bleeding heart vine only about twice a month.

According to the University of Illinois Extension, bleeding heart plants are susceptible to verticillium wilt which can also cause leaves to turn yellow; however, wilting usually occurs first. Plants can have the disease some time before symptoms appear.

The University of Maryland website indicates that bleeding heart can fall prey to fusarium wilt as well. This fungal disease attacks the roots and then the lower leaves and stems, working its way up the plant and invading the xylem or the vessels that transport water from the roots to the rest of the plant. Dark streaks may appear on the surface of a cut stem. Lower leaves wilt and turn yellow. As with verticillium wilt, infected plants should be destroyed.

Aphids can turn the leaves of your bleeding heart yellow. Aphids are small, pear-shaped insects that, according to “Rodale’s Garden Answers,” can be green, pink, black, dusty gray or white. They suck the sap from the plant, leaving it stunted and distorted. Leaves severely infected will drop off. Aphids may be removed with high-powered sprays of water. If not, aphid lions and parasitic wasps can be used. Spraying natural biodegradable soap at 1 capful per 1 quart of water may also help.

Here's some more information: http://homeguides.sfgate.com/life-cycle-bleeding-heart-plant-69907.html

By | 2015-11-23T20:23:14-08:00 November 23rd, 2015|Perennials|0 Comments

Scale Insects

We can't see clearly enought to be definitive, but this appears to be either scale insects or spider mites, nor can we say which species, from this photo. Neither of these plant pests usually cause major problems to plant health unless their population is very large. However, if you don't control them, and the conditions are right for their reproduction, they can get out of control. Keep your plant healthy and it will be better able to withstand the feeding. Control for scales varies by species or type of scale, but spider mite controls are mostly generalized. We've included web links for your reference in controlling these pests outdoors, but if this is a house-plant and the population is not large right now, we suggest you use a dilute solution of rubbing alcohol and water on a damp cloth and wipe the scales/mistes off of the leaf and stems. Don't over-do the alcohol as you can cause damage to the protective leaf cuticle with too high a concentration. You can also give the plant(s) a shower, literally, to clean off the pests, and any sticky exudate left by the scale feeding. Keep an eye out and continue to remove new developing pests. Otherwise, if the population numbers are high you can use pesticidal products, but they may not be very effective on the adult (covered) stage of the scale (they will work on the younger crawler stage if applied correctly), but they can be effective on mites. We recommend you use horticultural oils or pesticidal soaps whenever possible (you'll want to apply outdoors, but keep the plant in a shady location and make sure its watered a few hours before applying the oil to avoid burning the plant tissues)
For outdoor plants: http://www.ipm.ucdavis.edu/QT/scalescard.html
http://www.ipm.ucdavis.edu/QT/spidermitescard.html

By | 2015-11-23T18:53:34-08:00 November 23rd, 2015|Plant Pests|0 Comments

Browning Thuja

There are a number of possibilities for your ‘Emerald’ eastern white cedar (Thuja occidentalis) problem. A common cause of foliar browning in ‘Emerald’ cedars is due to root rot or root damage. We have had a wetter than normal season. If your garden is on clay soil and drainage is slow, the heavier rains this season might have caused problems at the root level. Other root-related issues include compaction of soil or mechanical damage. Thuja roots are relatively shallow/close to the surface, and at 10-12 years, your cedars’ root systems would be quite extensive – growing much further from the tree than you’d expect. So any new digging, for example, even if not immediately beside the trees might have an impact. Additonally, you should check closely to see if you detect any insects or diseases. Sucking insects such as mites or scale could contribute to the browning you see. This could also be winter or salt burn from the winter season. Once you determine the cause of the browning, then you can better treat it.

This could also be cedar apple rust fungus disease. It can attack cedars planted near apple trees or members of the apple family, including crabapples, hawthorn, Juneberry and mountain ash. These trees serve as "alternate hosts" for a fungus to develop and thrive. See if you can find gall-like growths on the branches. Cut out the galls. Then spray the cedar with a fungicide application to prevent new infestations.

We also recommend if you have eliminated bugs, which are treatable, and the majority of the tree is brown -- your cedar may be severely damaged. If most of the foliage is dead, the tree may not be worth saving. Take a picture of the tree and show it to a professional at your nearest nursery -- or better yet, take it to your nearest cooperative extension office. An extension employee will confirm whether the tree can be saved.

By | 2017-09-11T15:49:34-07:00 November 23rd, 2015|Trees|0 Comments

Winter Damage On Broad Leaf Evergreen

This is winter damage. Winter damage turns whole or part of broadleaf evergreens brown and often makes small leaf imperfections and leaf spots from the previous summer more noticeable. Winter damage is caused by cold winds and/or sunburn from the sun reflecting off of the snow. The plants that most frequently show winter damage are the broadleaf evergreens such as Cherry Laurel, Rhododendrons, Holly, Camellias etc. Boxwoods and Euonymus often turn dry and tan.

Because these plants have leaves that are scorched, the areas on the foliage that had some leaf spot damage from last summer are more evident. You'll see dark spots, or white spots where the leaf tissue actually died last summer or fall and now is turning tan or white. On some plants, such as cherry laurel, such dead leaf tissue often drops out and leave holes.

At this point there isn't anything that you need to do - the plant will drop this scorched foliage this spring and will put on new growth. Once you see that new growth appearing you can clip off any toasted twigs or branches that are not responding with new leaves, and prune any odd looking limbs away.

To help prevent leaf spot in the spring and summer, make sure that the plants aren't getting hit with water from a sprinkler on a frequent basis, as this is a prescription for leaf-spot fungi. To help protect broadleaf evergreens in advance of winter you can use an anti-desiccant product in October, although in a really cold or snowy winter plants will still show some winter damage.

By | 2015-11-23T16:01:53-08:00 November 23rd, 2015|Shrubs|0 Comments

Azalea Lacewing Or Spider Mite

We can't tell for certain by the photos, but the most prevalent insect attacking azaleas is the lace bug. Follow these tips. If you still can't tell, you may want to take a sample into your Extension office or a local garden center.

They are so named because of their lace-like wings. Both adult and immature bugs are usually found on the underside of leaves during April and May. They also produce a second cycle (brood) from July through September. Adult lace bugs are 1/8 inch long and 1/16 inch wide. This insect overwinters on your azaleas in the egg stage, and will hatch the following spring when the temperatures begin to warm.

Lace bugs damage azaleas by removing or sucking the sap from the plants as they feed. Damage is recognized by a blotched or spotted grayish appearance of the upper leaf surface. Eggs and spots of excrement resembling dark varnish will appear mostly on the underside of the leaves. Heavily infected leaves will turn yellow, then brown, and drop off prematurely.

A second insect pest of azaleas is spider mites or southern red mites. Spider mites are dark red and very small (0.4 mm long), and most active from January through June. Their damage closely resembles that of lace bugs. Spider mites feed on the lower leaf surfaces causing infested leaves to turn gray or brown and drop prematurely.

If you examine the leaves very carefully, you can usually see the mites or their webbing on the underside of the leaves. Another method of detection is to place a piece of white paper under several leaves. Tap the leaves on to the paper. If you have spider mites, then you’ll most likely see tiny red specks moving around on the white paper.

By | 2015-11-23T10:21:11-08:00 November 23rd, 2015|Plant Pests|0 Comments

Magnolia Leaf Drop

Your Magnolia is clearly under stress. Here are several possible causes based on what we can see in the photo. Although deer damage is possible, one way to tell if damage is from deer is that the damage is deer height, the lower portion of the plant. Upper regions beyond their reach are often left untouched. We can't see the top of the Magnolia to verify if the upper leaves are intact. However, if the leaf drop is throughout the tree, while there may be some deer damage, overall leaf drop suggests the problem stems from other causes such as the tree not receiving enough or too much water or nutrients. Magnolia like to be kept moist, even when dormant in the winter. A layer of several inches of organic mulch helps retain moisture and helps minimize soil temperature extremes. If your Magnolia isn't in a drip irrigation system, you'll want to make sure that it receives regular water. Newly transplanted trees can suffer stress if they dry out.

Magnolias also prefer acidic soil. The soil in your area is usually alkaline. You may want to contact the nursery or vendor where you purchased the tree for their recommendations on soil amendments specifically for Magnolia. While these beautiful trees do have some pests that can bother them, healthy plants tend to be less bothered by them.

As a fairly new transplant, your tree is still adapting to its new planting site. Some of the suggestions provided may improve your Magnolias overall health. Some leaves appear to be returning already! If your tree doesn't respond to these changes, you may want to contact either the nursery or vendor where you purchased the tree or your local extension agency for more specific help. Here's a link to the Nevada Extension Agency - http://www.unce.unr.edu/

Here's a link for more information on general Magnolia care, including fertilization - http://www.gardeningknowhow.com/ornamental/trees/magnolia/magnolia-tree-care.htm

By | 2015-11-23T08:00:40-08:00 November 23rd, 2015|Plant Diseases|0 Comments

Browning On Houseplant Leaves

Browning in the interior of leaves on houseplants can be caused by several situations including sunburn, fertilizer burn, salt or fluoride build-up, contact from cleaning products, or diseases such as powdery mildew. Sometimes without culturing in a lab it's hard to pin it down. For leaves such as yours that show browning in between the veins on the leaves it can be narrowed down a bit since sunburn would present over the entire leaf surface, fertilizer burn would be likely to show along all edges, and contact from cleaning products would cover the entire surface of the leaf. So that narrows it down for your plant to sunburn (unlikely at this point on Cape Cod!), salt/fluoride build-up, or disease.

Of these three, we're wondering about powdery mildew first because of the faint, grey appearance we see on the bottom and bottom right of the leaf. If you see this continuing to develop on the leaf, that may be the clue to the cause. Look under the leaf for signs of grey powder as well.

No matter what is the cause, remove all the leaves that look like this and throw them away. This will make the situation easier to monitor as well. Next, be sure that the health of the plant is supported by watering deeply less often (don't just give a "lick and a promise - water the plant deeply when you water, soaking the entire root ball and letting the water drain into a saucer below. After a couple of hours empty that saucer so that the plant isn't kept too wet.) Be sure the plant has good air circulation and the room that it's in doesn't go much below 60 degrees.

If it seems like powdery mildew isn't the issue, perhaps this plant has been in the same pot for some time and there has been a build up of something that is causing the leaf issue. If this is the case, repot the plant and remove as much of the old soil as possible without harming the roots, and replace that with clean, new potting soil. Don't start to fertilize for a month until the plant gets resettled. Consider using an organic fertilizer in the future.

If you see that powdery mildew could be the problem, get a fungicide that's labeled for powdery mildew at your garden center and use it according to directions.

If we haven't hit on the answer yet, take some more shots including underneath of the leaves and give us some more information about the history of the plant and we'll take it from there!

By | 2015-11-23T04:47:40-08:00 November 23rd, 2015|House Plants|0 Comments

Minor Leaf Damage

This could be one of two things, and without seeing more samples it's hard to know which. After reading this if you want to pursue it further you might send two or three shots showing foliage with more damage and some shots of the back side of the leaves. Here are the two options:
1. Insect damage. If this is caused by an insect it would be one that chews (as opposed to an insect that sucks plant juices) and there are several active in northeast gardens right now. Japanese beetles, Asiatic garden beetles and earwigs all do this type of damage. If this sample is the worst of it, and if it doesn't get worse, this falls into the "acceptable level of damage" in a garden. (No garden is ever perfect. Let's face it, it's a jungle out there!) You might go out after dark with the flashlight app on your phone and look at this plant since most of the insects that chomp on leaves do so at night.

2. Fungal damage. Sometimes fungal damage resembles insect damage because as the tissue of the plant dies it falls away and looks very similar to a leaf that's been munched. What makes me think that this could be fungal is the light spot with the dark edges on the leaf to the right, and the "water soaked" appearance of tissue around the hole in the leaf in the center. That has the look of a leaf-spot fungus. If it is fungal you'll see other spots develop that first look yellow and/or water soaked, and then the tissue dries and falls away. Be sure that this plant isn't getting hit with an automatic irrigation system, or that the leaves aren't being watered frequently with a hose or sprinkler: frequent splashing of foliage with water is a prescription for leaf spot fungi.

So what to do? Here are your options: Monitor the plant and see if the problem continues. This is best done by marking some UNDAMAGED foliage with a twist-em or piece of yard and watching to see if it remains undamaged. Remove the worst of the damaged leaves to make monitoring easier as well. If the problem has stopped you can ignore it.

Secondly, if you find an insect that you suspect is doing the damage (see more than one so you know you're not "framing an innocent bystander") take that bug into your local garden center and decide on the treatment that suits you best.

Third, if you think it's fungal there are several organic fungicides that would help protect the rest of the plant including sulfur, copper and beneficial bacterias in products such as Serenade and Actinovate. Only spray the plants effected since you don't want to kill off all the good fungi in your garden. The same with the insecticide: there are more "good guys" in your landscape (insects and fungi) than "bad guys" and you don't want the beneficials to fall from "friendly fire." So to speak.

Send more photos if you wish to pin things down further.

By | 2017-09-11T15:49:34-07:00 November 22nd, 2015|Plant Pests|0 Comments

Stretched Echeveria

You have an Echeveria that is really suffering because of poor conditions. It is stretching and losing its color because it is not getting enough light - It looks like it is also way overwatered. It's difficult to bring them back to normal at this stage so here's what you can do - bare with me! First, stop watering. The very lowest leaves are goners so just pull off and toss. Take a look at the overall length of the stem from soil level up to the top. Cut the head of the plant off about half way up that stem. It should leave you with a stem in the pot with a few large leaves attached, and the decapitated rosette in your hand. Move the pot with the original stem to an area that receives very bright light, even a bit of direct morning sun. Don't water that pot again until the soil has become fairly dry. When it has, you can water again. This is the way you typically want to water succulents, letting the soil dry out a bit before watering again. With any luck, in a few weeks you should see some tiny new rosettes forming on that old stem and you're home free. It should grow as a multi-rosette plant, and if you keep it in the brightest, slightly sunny spot you have, it should color up, grow more compact and rose-like. Now for the heat you have left over, remove a few of the larger lower leaves and save them, giving your rosette just a little stub of a stem on the bottom. Stick it and the few saved leaves and put them on a paper plate and put them somewhere out of the way for about a week so they can callus over their cuts - I usually stick them on top of the refrigerator so I don't forget them. after the week, prepare two small new pots with new potting mix that drains well. Gently just snuggle the little stub of the rosette into the soil of one pot, and lay the leaves on the soil of the other pot with their skinny ends just touching the soil - they sometimes do this easier if you lay them upside down. Now, for both pots, back on the fridge or wherever, out of the sun, and no water - just dry soil. Leave about another week or so and by then you should start to see new roots on the leaves and the same thing should be happening on the rosette stem. NOW give them a good drink and move them to the brightest location - avoid full sun for a while until they get going. Water them as I had mentioned before allowing the soil to dry out slightly before watering again. If the Plant Gods are with us, you will wind up with at least one healthy plant to start with again, but likely you'll have several plants after awhile - GOOD LUCK!

By | 2015-11-22T17:21:36-08:00 November 22nd, 2015|Plant Diseases|0 Comments