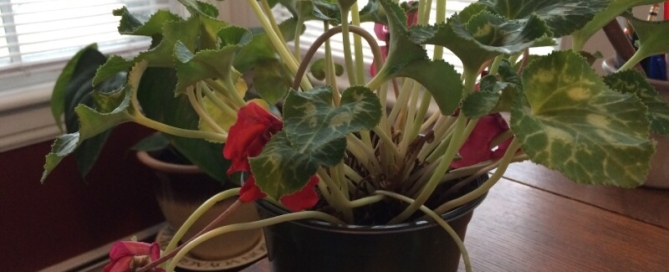
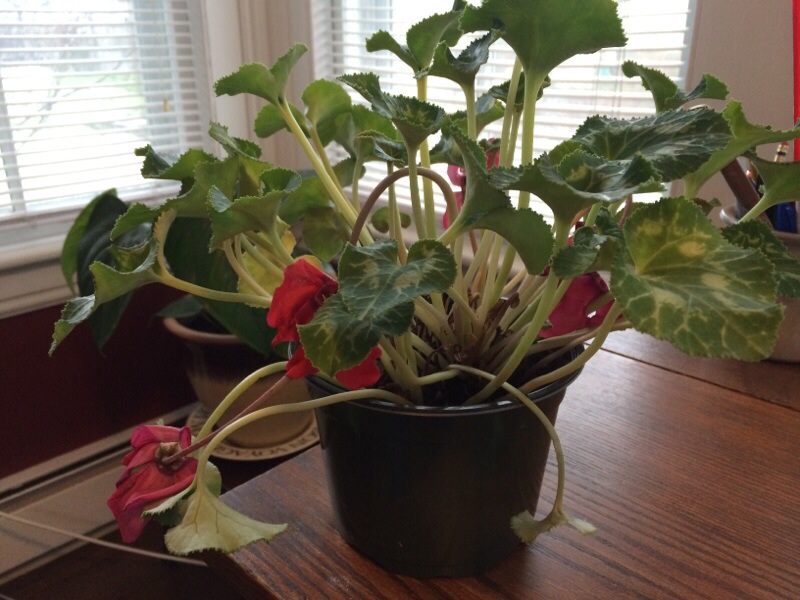
Cyclamen Woes

/Cyclamen Woes/

Cyclamen Woes

Although cyclamen are beautiful, winter flowering plants they are not the easiest to care for. Your plant looks like there are probably a couple of things that are making it unhappy. Here is what you need to provide for a long-lived cyclamen, although know that even those plants that people keep in flower and healthy through the winter often go into a dormant period and stop flowering in the spring. This is not a plant that flowers continually.
1. This plant needs to be in a very bright location - an eastern window is ideal. If you have southern or western exposures put it near but not directly in those windows, and keep the shades open.
2. Cool temperatures. This plant gets leggy and stops flowering in warm temperatures. So if your house is heated to 70 or above it's likely to go into decline.
3. Bottom watering. You may already be watering this way, but what is best is to fill a bowl with water, put the pot in that bowl for an hour, and then take the pot out and let it drain into a saucer. Don't leave the pot in standing water for more than a couple of hours.
4. Don't ever let the plant get so dry that the plant wilts. When this happens the buds that are growing dry up and don't recover. Some plants are forgiving and bounce back if they go dry and wilt, but a cyclamen isn't one of those.
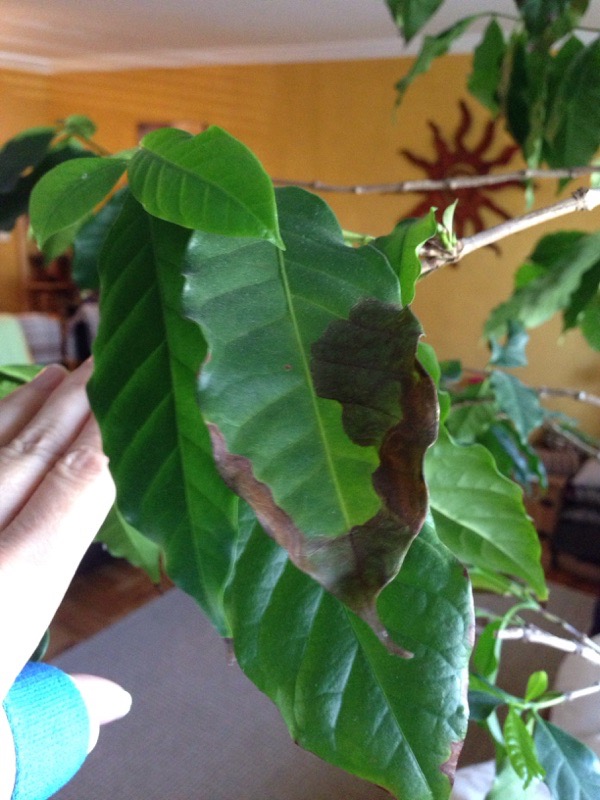
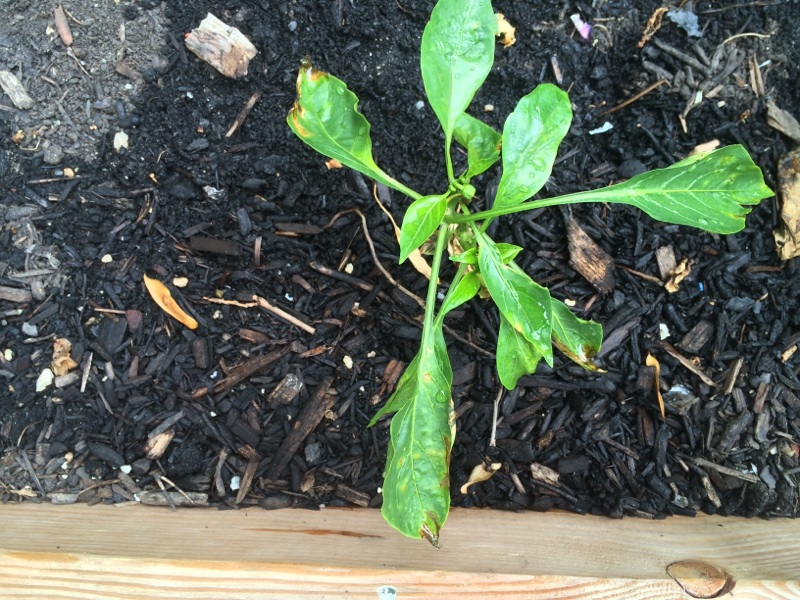
5. Be on the lookout for insects. This photo isn't close enough for us to see any signs of cyclamen mites or whitefly but you should watch for fine white "litter" on the foliage or sticky leaves or table under the plant. If you see signs of this ask for a miticide or insecticide at your local garden center.

By | 2017-09-11T15:49:32-07:00 December 3rd, 2015|House Plants|0 Comments

Black On Coffee Tree

Although it's impossible to diagnose a problem from a photo alone, here are our impressions and the questions to ask that should lead you to some help.
1. This does not immediately strike us as a disease problem. Fungi, bacterial and viral problems on houseplants have a different look.
2. Browning on leaf margins such as we see here is usually caused by either drying out in between waterings, fertilizer burn or a combination of the two - see below.
3. Has this plant been in the same pot for a long time? Since we can't see the container, it's difficult to know if it's too small for the plant at this point. But what happens to all container plants as they get larger is that the pots become congested with roots and this makes it harder to hold water in that container. So you might be watering as you always have been, but because the plant is root bound that same amount of water is no longer enough. If the plant has been in the same container for three years or more it needs to be repotted.
4. Has the plant been moved to a new location that might have more sunlight or be drier because it's close to a heating unit? If so, that can cause the soil to dry more quickly.
5. Did you fertilize in the last two months, and if so, was the fertilizer either mixed slightly too strongly or applied to a dry plant? Either of these can lead to fertilizer burn. If you think that this might be the problem, flush the soil with lots of water, repot if the plant is root bound, and in the future mix at low rates and never fertilize a thirsty plant.

By | 2015-12-02T21:33:20-08:00 December 2nd, 2015|House Plants|0 Comments

Leaf Spot On Tomato

Your leaf spot could be a couple of different fungal problems and without culturing in a lab it's impossible to say which one you have. This might be septoria leaf spot, or it could be the beginnings of early blight, or another fungus - but the response to all three is the same.
1. When you water be sure to water deeply less often, and not to get the foliage wet if you can help it. Watering with soaker hoses is a good way to water tomatoes. Avoid watering in the evening so that the foliage stays wet all night - water in the morning if you are using sprinklers, and water every four to six days instead of every other day, for example.
2. Pick off the worst of the spotted leaves and throw them out. In future years be on the lookout and start removing spotted foliage early.
3. Start spraying with one of the organic fungicides such as Actinovate, sulfur or copper. Use according to directions. This won't "cure" the problem but can protect undamaged foliage and fruit until frost. In future years start spraying before plants have a problem and spray regularly according to the directions on the label.
4. Since most fungi are air born AND overwinter in the soil, mulch around your newly planted tomatoes as soon as they are planted to prevent spores from splashing from the ground to the plants in future years. There is no soil treatment you can use to kill harmful fungi that doesn't also kill the beneficial fungi, so don't consider treating the soil with fungicides - they don't work.
5. When you clear out the garden this fall either throw out the old tomato foliage and old fruit or burn it - don't leave it in the garden over the winter.

Fungal diseases are something all northeast gardeners dance with when growing tomatoes - given the treatments above, however, there is no reason you can't grow tasty, organic tomatoes all summer until hard frost. A freshly picked tomato is worth all our efforts.

By | 2015-12-02T19:28:48-08:00 December 2nd, 2015|Plant Diseases|0 Comments

Fungal Problem On Peppers

You have one of the fungal diseases that can affect vegetables. Without culturing in a lab it's impossible to say for sure which one this is, but the treatment and prevention for the home gardener is the same.
Note that many fungal conditions can be worse when nights are cool since moisture condenses onto plants (dew) and keeps them damp overnight. It's been a cool summer in the northeast, and peppers like it hot, hot, hot! So it's only natural that there may be more leaf spot and fruit rot problems in a season where the nights are cool.
1. Be sure not to water in the evening and try not to get the fruit wet when watering when possible. Water deeply less often - don't hand water because that will lead to the necessity of watering frequently. Soaking the garden with a soaker hose or sprinkler for a long time every 5 days is better than shallow watering less often, since watering frequently is likely to get the fruit wet.
2. Spay with one of the organic fungicides such as Actinovate, Serenade or copper. Ask for an organic fungicide at your garden center and use it according to directions. Be sure to spray the leaves, developing fruit and stems. Next season start to spray your pepper plants early, before they get the problem since it's easier to prevent fungal problems than it is to treat them once they have arrived.
3. Throw out infected fruit - don't let it stay in the garden. Once the pepper plants have stopped bearing pull them and toss them out or burn them too - don't add to the compost pile.

By | 2017-09-11T15:49:32-07:00 December 2nd, 2015|Plant Diseases|1 Comment

Rhody Curling Leaves

Many Rhododendrons in the landscape look like this at this time of year in the Northeast. It is a sign of stress, and could be root rot, other root or stem damage from the winter, a combination of sunburn and wind burn, or a combo of all of these. With plants sometimes what we see isn't the result of just one thing but several combined.

1. Without culturing in a lab we can't know if it's phytophthora or not. That will be a time-will-tell kind of thing.

2. Look at the bottom of the plant - examine the stems carefully, especially from ground level to about 8" up. Plants that have been in snow are sometimes girdled by mice or voles eating the bark all the way around the plant. Once the bark is eaten, water is no longer carried up the stems to reach the leaves, so they curl.

3. Are these plants on a sunnier or windier side of the house? If so, this cold be sun or wind burn. Sunburn is especially hard on Rhodys when there has been a snow cover, since the sun reflects off of the snow and draws moisture out of the leaves. In such situations when the ground is frozen the plant can't replace the moisture that the sun/wind has drawn out and the leaves curl.

4. Are these a different variety of Rhododendron from your others. Different hybrids/species/cultivars are more or less sensitive to winter burns and stresses. In many landscapes you can see plants right next to each other and one variety is yellow and curled while another is healthy looking and green. The interesting thing is that in two months both plants look fine - the "damage" done to the curled one goes away as the temperatures warm.

At this point, other than considering the above, you should wait and see if these plants do indeed recover later in May. Provided that they don't have girdled stems (no recovery from that) you could apply a light application of an organic fertilizer and an inch of compost or composted manure all around the plant under the dripline and then wait to see if there is recovery. If they still look bad in mid-to-late-May you'll know they are gone. If water/drainage is an issue there don't plant Rhododendrons again - consider Winterberry Holly, red-twig dogwood or other moisture-tolerant plants.

By | 2015-12-02T07:07:52-08:00 December 2nd, 2015|Shrubs|0 Comments

Scale And Winter Damage

Your bumpy stems and the brown leaves are due to two different problems. The bumpy stems are most likely scale although we'd need to see the plant "up close and personal" to be absolutely sure. Not only does scale cause brown dots and scars, but it also causes the grey-black look that we see on the stems here. That is sooty mold, which forms on the plant juices that sucking insects such as scale excrete. The mold isn't a problem, just a symptom that a sucking insect is at work. Look under the leaves that are above these stems - are there either small tan dots or white cottony things on the underside of the leaves? If so, that confirms that it's scale. Spray the plant with Horticultural Oil from your local garden center, applying it at least three times this season and coating the stems and underside of the leaves as well.

Cherry laurel is known for getting winter scorched leaves. Winter damage is caused by cold winds and/or sunburn from the sun reflecting off of the snow. The plants that most frequently show winter damage are the broadleaf evergreens such as Cherry Laurel, Rhododendrons, Holly, Camellias etc.

Because these plants have leaves that are scorched, the areas on the foliage that had some leaf spot damage from last summer are more evident. You'll see dark spots, or white spots where the leaf tissue actually died last summer or fall and now is turning tan or white. On some plants, such as cherry laurel, such dead leaf tissue often drops out and leave holes.

At this point there isn't anything that you need to do - the plant will drop this scorched foliage this spring and will put on new growth. To help prevent leaf spot in the spring and summer, make sure that the plants aren't getting hit with water from a sprinkler on a frequent basis, as this is a prescription for leaf-spot fungi. To help protect broadleaf evergreens in advance of winter you can use an anti-desiccant product in October, although in a really cold or snowy winter plants will still show some winter damage.

By | 2017-09-11T15:49:32-07:00 December 2nd, 2015|Shrubs|0 Comments

Still Looks Like Rust But

It really does look (and sound) like rust fungus, but there may be other issues. For example, what did you amend your clay soil with (and we're assuming you planted them in the ground and did not amend the soil and put them in pots)? It sometimes takes quite a bit of amendment to make a clay soil drain well enough for plants like this, that like very good drainage. If the plants are not healthy due to root issues from too much soil moisture and not enough oxygen available to the roots (clay soils can also be very compact and air does not move thru these soils), they will be more susceptible to diseases, even those they don't usually get (but which can infect them). We recommend you look closely at the leaves, especially the underside for the fungal rust spores (orange and/or dark brown to black) and if you find this we recommend you get a fungicidal product (neem oil may be appropriate) and follow the label directions before making application(s). Full sun is correct for these plants and they should be watered when soil moisture is almost depleted in a well drained soil. This may take longer in a clay soil, but in either case, we recommend watering deeply less frequently, rather than smaller amounts of water more frequently. We also suggest you take a couple of stem & leaf samples (sealed in a bag) to your local garden center and try to get a second opinion; provide as much info to them as possible about the care given to these plants. We hope this helps resolve the issue, but if all else fails, you could take another sample (also sealed in a bag) to your local Dept of Agriculture Office and they will usually send the sample to the county plant pathologist and report back to you for free.

By | 2015-11-13T20:33:58-08:00 December 2nd, 2015|Herbs|0 Comments

What Fertilizer Did You Use

I see that the foliage is looking a bit yellow and that there is some browning on the edge of a couple of the leaves. Did you use an organic fertilizer or a synthetic one such as one of the "blue liquids?" If you used a synthetic and used a bit too much you might be seeing signs of fertilizer burn. If you used an organic product it wouldn't be fertilizer burn.

It's possible that the yellowing is just some of the leaves shutting down as peonies can do at this time of year. Are all the leaves looking like this or just the older ones? Has the plant been watered deeply once a week through the summer? In general peonies need one inch of rainfall (measured in a rain gauge not a carton or cup) over a 24 hour period, once a week. If the plant hasn't gotten that much water it might just be starting to go into "fall mode" a bit early.

In general this isn't a great time of year to fertilize peonies (or other perennials) in that the time when they put on their growth is in the spring and early summer. Right now perennials are stockpiling carbohydrates that they will use for winter survival, and they use the growth that was created in the spring to do this.

Additionally, the blackening you see might be fungal in origin - it's natural to see some signs of leaf spot fungi at this time of year and this year more plants are showing fungal issues because of the cool night temperatures.

The best thing for you to do at this point is to make sure the plant gets deeply watered once a week. A light application of composted manure on the top of the soil is always a good idea for plants as well.

If the leaves continue to yellow and turn brown, and you used a synthetic fertilizer, soak the soil well today to flush some of it away and hope for the best. In the future fertilize these plants with an organic such as Flower-tone applied in the early spring.

By | 2015-12-01T22:37:47-08:00 December 1st, 2015|Plant Diseases|0 Comments

Pepper With Failure To Thrive

We think that there are several things going on with your pepper plant. Two of them stem from the same cause: the cool summer weather. Peppers love it hot, hot, hot. They grow best when the night-time temperatures are well into the 70's, but this summer in the Northeast the nights have been cool. So that's the first issue. The cool nights also have encouraged septoria leaf spot, which causes brown spots on pepper leaves. The edges of your plant have fungal damage, probably this leaf spot.

Beyond these two conditions, consider if the following other things are an issue:
Peppers grow best in full sun - make sure a garden where you plant peppers is getting at least 6 hours of dead-on sun including the noon hour.
Peppers grow best in soil with a pH of between 6.2 and 7 - in other words, slightly acidic or close to neutral. If other things in your garden aren't doing well it would be worthwhile to have a pH test done of the soil.
This photo shows lots of bark on or in your soil - is it mixed into the dirt or just laying on top? Is there actual dirt in this bed or just compost? Plants need more than pure compost, and they don't grow as well with LOTS of high-carbon materials such as bark mixed into the soil. This is because those high-carbon organics (dried leaves or sawdust is the same) will take nitrogen out of the soil for decomposition and this doesn't leave enough nitrogen for your plants. If there is lots of bark in your soil you should get some loam and mix that in, perhaps with an organic source of nitrogen such as bloodmeal or cottonseed meal. You could also add some general organic fertilizer to the soil - ask for a recommendation from your local garden center.

If in the future you have fungal issues in the veggie garden, spray with an organic fungicide such as Actinovate, Serenade, Green Cure etc - or get a recommendation from your garden center. Use any product according to directions.

By | 2015-12-01T19:03:44-08:00 December 1st, 2015|Vegetable Plants|0 Comments

Canker Or Winter Damage Or Animal Damage

There are three possibilities for a maple tree with bark that looks like this. You will need to let some time go by and watch this plant to see which of these is the likely cause of what's going on with the bark. Note that sometimes more than one thing has caused the symptoms we see, and that could be the case here.
1. Canker disease is one possibility. There are several types of canker that attack maple trees and without seeing their "fruiting bodies" it's impossible to tell which type this might be. All of them are different types of fungus. They typically show up on trees that have already be stressed by drought, freeze injury (see below), or physical wounds. The fungi enter the bark through wounds and there is no cure for canker - if you see it on a side branch that stem can be removed but on a trunk there is nothing to be done. Fungicides are a waste of your time and money. The good news is that some trees live with canker for many, many years. It's a "time will tell" situation. You can read more about canker on maple trees here: http://maple.dnr.cornell.edu/pubs/diseases/bark.htm
2. Freeze injury. If this damage is on the south side of the tree, suspect freeze injury. In the winter the south side of trees freeze and thaw, freeze and thaw, as the warm sun heats them during the day and it gets cold at night. This can cause cracks and flaking bark. Usually the trees grow out of it or the new tissue covers or surrounds the cracks and the tree is OK. Occasionally one of the canker fungi enters these wounds, however, as we spoke of before.
3. Animal injury. In the winter time when food is scarce, mice, voles, chipmunks, squirrels, and birds all scramble to find any little thing they can eat. Animals often eat bark, or damage bark to get to insects that are underneath, or tucked inside, the bark. Trees usually grow out of this damage unless it circles the plant 360 degrees and the plant ends up girdled.

So what do you do now? Wait and see how the plant does over the summer. Support it with a good deep soaking every week to ten days if it hasn't rained - get a rain gauge and monitor rainfall...if Mother Nature delivers an inch or more of rain a week (measured in a real rain gauge not a carton or tin can, which isn't the same) you don't have to water. If there isn't that amount of rain use a soaker hose or sprinkler to soak the area under the dripline well once a week. An application of compost or composted manure 1" thick around the tree under the dripline is also great but don't be tempted to "help" by applying lots of fertilizer...that actually will make the tree weaker. Organic matter (decaying leaves!) is how nature fertilizes her trees and keeps them healthy - we gardeners need to take a hint.

By | 2017-09-11T15:49:32-07:00 December 1st, 2015|Trees|0 Comments